# Work with your contact records
By [creating a contact record](https://knowledge.ostsdigital.com/hubspot-crm/contacts/create-contacts) for everyone who interacts with your business in HubSpot, you build a good contact database. This will allow your team to easily record and retrieve information on anyone your business interacts with, helping everyone to stay on the same page.
Once created, you can store and retrieve information on a contact by interacting with their record.
## View a contact record
* In your HubSpot account, navigate to **Contacts** > **Contacts**.
* In your [contacts home](https://knowledge.ostsdigital.com/hubspot-crm/contacts/a-guide-to-your-contacts-home), locate the contact you want to work with and click their **name**. This will bring you to their record.
The following sections cover the left panel, middle panel, and right panel of the contact record.
## About and actions
The left panel shows the contact record's properties and actions you can perform with the record. Learn how a user with [admin access](https://knowledge.hubspot.com/settings/hubspot-user-permissions-guide#admin) can [customize the left sidebar for all users and teams](https://knowledge.hubspot.com/settings/customize-record-sidebars).
* At the top, view and edit the primary properties for the record. You can click the **profile picture** to update the contact's image and the edit **pencil icon** to edit their name.
**Please note**: record images are used internally to identify contacts or companies in your HubSpot account; your contacts and companies cannot see record images.
* At the top right of the left panel, click the **Actions** dropdown menu:
* **Follow:** click to follow the record. By default, you follow all records you own. By following a record, you will receive [notifications](https://knowledge.hubspot.com/contacts/follow-a-record#set-your-follow-preferences) on updates to the record.
* **View all properties:** click to view all properties of the record.
* **View property history:** click to view the history of the property values of the record.
* **Search in Google:** click to search the contact's name and company on Google.
* **Opt out of email:** click to [disable email communication](https://knowledge.hubspot.com/contacts/how-do-i-unsubscribe-or-opt-out-contacts-from-email) with the contact.
* **Merge:** click to merge the contact record with another.
* **Delete:** click to delete the contact record. Learn more about [the data lost during a deletion](https://knowledge.hubspot.com/contacts/delete-a-list-of-contacts#data-lost-in-deletion).
* Below the primary properties, interact with the record by clicking the respective icons.
* **description Note:** click to add a [note](https://knowledge.hubspot.com/articles/kcs_article/contacts/manually-log-a-call-email-or-meeting-on-a-record).
* **email Email:** click to write a [one-to-one email](https://knowledge.hubspot.com/articles/kcs_article/email/send-and-reply-to-one-to-one-emails).
* **calling Call:** click to [call](https://knowledge.hubspot.com/articles/kcs_article/calling/use-the-calling-tool#make-a-call).
* **add Log:** click to [manually log an activity](https://knowledge.hubspot.com/articles/kcs_article/contacts/how-to-log-a-call-email-or-meeting-on-a-contact-record).
* **tasks Task:** click to [create a task](https://knowledge.hubspot.com/articles/kcs_article/tasks/use-tasks#create-tasks) for the record.
* **meetings Meet:** click to [set up a meeting](https://knowledge.hubspot.com/articles/kcs_article/integrations/how-can-i-schedule-a-meeting-with-a-contact).
* View and edit the contact's property values in the *About this contact* section. Learn how to [edit the properties that appear in this section for you](https://knowledge.hubspot.com/contacts/select-properties-to-show-under-the-about-section-in-a-record). [Admins](https://knowledge.hubspot.com/settings/hubspot-user-permissions-guide#admin) can also [customize the section for the users in the HubSpot account](https://knowledge.hubspot.com/settings/customize-record-sidebars).
* To edit a property value, hover over the **property** and click the **edit** **pencil icon**.
* To view a specific property's history, hover over the **property** and click **Details** or scroll down and click [**View property history**](https://knowledge.hubspot.com/articles/kcs_article/contacts/how-do-i-see-the-historical-values-for-a-contact-company-deal-ticket-property) to see the history of all property changes.
* To view all properties, click **View all properties**.
* In the *Communication subscriptions* section, view and edit the contact's subscriptions. This section is only available if you have [GDPR functionality turned on](https://knowledge.hubspot.com/account/how-do-i-turn-on-gdpr-functionality-in-my-hubspot-account). Learn how to [add a subscription for the contact](https://knowledge.hubspot.com/articles/kcs_article/contacts/manage-your-subscription-preferences-and-types#how-to-manage-your-contacts-subscriptions).
* In the *Website activity* section, view interactions with your website.

## Activities on the contact timeline
The middle panel shows activities relating to the contact chronologically, with the latest activity at the top.
If you want more space to view the record's timeline, you can collapse the right panel by clicking the last icon at the top of the panel, and expand the panel again by clicking the first icon.
You can filter these activities in the following ways:
* To quickly filter activities, click the **tabs** at the top.

* In the *Activity* tab, you can [filter more specific activities](https://knowledge.hubspot.com/articles/kcs_article/contacts/customize-activities-on-a-contact-company-deal-ticket-record-timeline) with the **Filter activity** dropdown menu .
* To filter activities that are owned by a specific user or team, click the **All users** or **All teams** dropdown menus and select a **user** or **team** .

In the right panel, view the other records and tools associated with the record. You can rearrange the sections by dragging them.
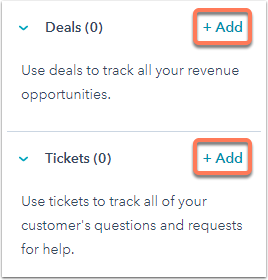
### Associated records
Record associations are displayed under the respective record type sections (i.e., *Company*, *Deals*, *Tickets*). Learn about [associations](https://knowledge.hubspot.com/crm-setup/associate-records).
To associate your contact record with another record:
* In the relevant record type section, click **Add**.
* You can either create a new record to associate to the contact, or associate an existing record to the contact.
* To create a new record to associate the ticket to, in the **Create a new \[record]** tab, enter information into the fields, and click **Create**.
* To associate an existing record, click the **Add existing \[record]** tab, search for the record, and select the **checkbox** next to the record in the search results. Click **Save**.
### Attachments
You can [attach files](https://knowledge.hubspot.com/contacts/add-and-remove-attachments-from-records) to the contact record. You can also [view attachments that were sent as part of a logged email to the contact](https://knowledge.hubspot.com/email/how-do-i-add-a-document-attachment-to-a-hubspot-email).
### List and workflow memberships
You can also view the record's associations with other tools in HubSpot. These sections, *List memberships* and *Workflow memberships*, shows you the number of [lists](https://knowledge.hubspot.com/lists/create-active-or-static-lists) and [workflows](https://knowledge.hubspot.com/workflows/create-contact-based-workflows) the contact is in.
* Click **Manage list memberships** to view all the lists the contact is part of. In the *List memberships page*, you can [manage their registration to any private content](https://knowledge.hubspot.com/cms-pages-editor/control-audience-access-to-pages#troubleshoot-membership-registration-for-private-content).
* Click **Manage workflow memberships** to view all the workflows the contact was and is enrolled in. In the *Workflow memberships* page, you can [enroll the contact in a workflow](https://knowledge.hubspot.com/workflows/manually-enroll-objects-into-workflows#enroll-from-a-contact-record).

### Playbooks
When communicating with the contact, you can click a [**playbook**](https://knowledge.hubspot.com/playbooks/use-playbooks) to display certain prescribed questions or steps to prepare yourself better.
### Salesforce sync
The *Salesforce Sync* section shows if the contact record is syncing with Salesforce through the [HubSpot-Salesforce integration](https://knowledge.hubspot.com/salesforce/install-the-hubspot-salesforce-integration). If the contact isn't syncing with Salesforce or if you want to ensure the contact remains synced to the Salesforce record, click **Sync now**.